Content Publisher for Next.js: How to Get Started
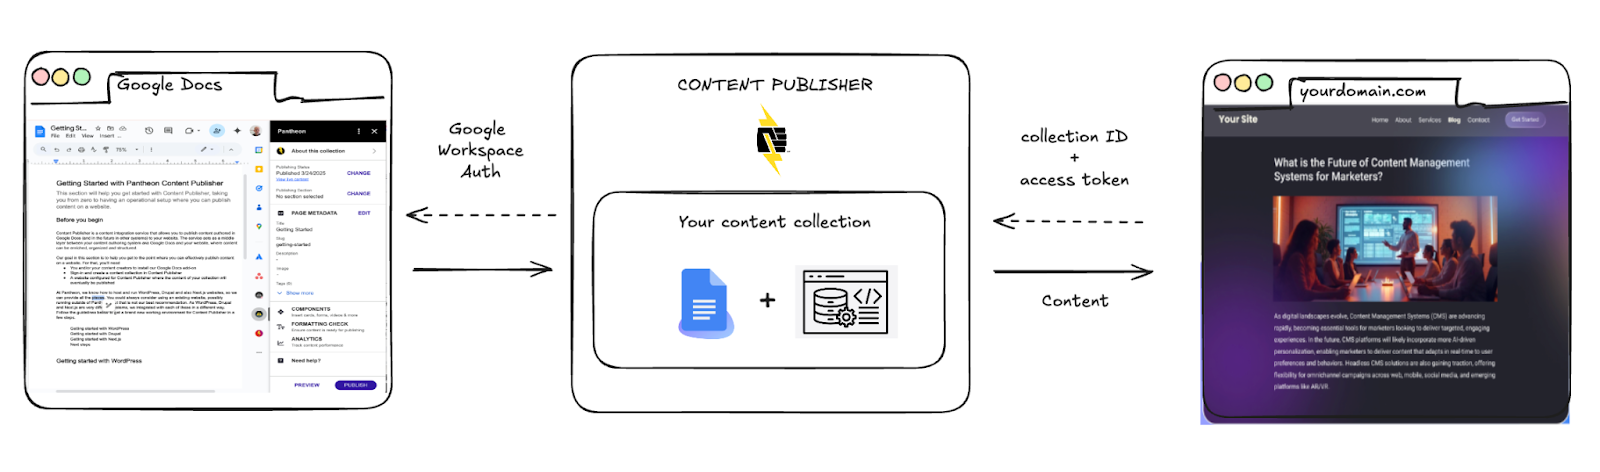
Content Publisher is a content integration service that allows you to publish content created in Google Docs to your Next.js website (we plan to support other authoring tools than Google Docs in the future). The service acts as a middle layer between Google Docs and your website, where content can be enriched, organized and structured. Think of it as a headless-CMS with Google Docs as an editorial interface.
Our goal on this page is to help you get to the point where you can effectively publish content on a website. For that, you’ll need:
- You and/or your content creators to install our Google Docs add-on
- A content collection initialized in Content Publisher
- A Next.js website configured for Content Publisher where the content in your content collection will be published
Let’s get this running!
- Ready to install a Next.js development environment on your laptop
- A host where to deploy your Next.js application, we are agnostic and it could be Pantheon.io, Vercel, Netlify or others
- For a Pantheon hosted Next.js site, see this tutorial instead (Beta access required).
1. Install Node.js and NPM.
For instructions on installing Node.js, visit https://nodejs.org/en/download
2. Install the Content Publisher CLI from your command line
npm add @pantheon-systems/pcc-cli --global
3. Sign-in to Content Publisher with the CLI
pcc login
4. Create a new content collection (previously called “site”) replacing <url-of-the-site> with the URL of the site you will connect it to (if you don’t know it yet, you can provide a placeholder value, you can change it later)
pcc site create --url <url-of-the-site>
5. Initialize your Next.js project, replacing <project-name> with your project name, from our starter kit (there are multiple options, check the command line helper, we typically recommend using the Typescript and ESLint variants)
pcc init <project-name> --ts --eslint
When prompted to choose a site, say yes (Y) and choose the collection with the URL previously created, when prompted if you want to create an access token, answer yes (Y).
6. The installer automatically set the collection ID and access token as environment variables in a .env.local file (you can always update these later if you need a new access token or to connect to a different collection)
PCC_SITE_ID=xXXXXXXXXXXX
PCC_TOKEN=xxxxx-xxxxx-xxxx-xxxx-xxxxxx
7. 🎉 Your site should be ready to test on your local host and to use for development purposes.
You can test it
cd <project-name>
npm run dev
8. Deploy to production.
Deploy your site to your host of choice (hoping it is Pantheon). Make sure the production environment also contains the Content Publisher configuration (matching your local .env file).
9. If you provided a placeholder URL in step 4 above, update your Content Publisher collection configuration on the CLI with your hosted site’s URL
pcc site configure <site-id> --url "<new-url>"
10. Prepare for publishing your first document by going to Google Docs and installing the Content Publisher add-on
- Go to the add-on page
- Install the add-on
- Create a new Google document for your first test
- Open the add-on
- Connect the document to your previously created collection (referred to by the website URL)
- Preview and publish the document
- Check the live page… on Google marketplace.
🎉 You made it!